Products
Download
- Download All Products
- Download FairStars Audio Converter Pro
- Download FairStars Audio Converter
- Download FairStars Recorder
- Download FairStars MP3 Recorder
Purchase
- Order FairStars Audio Converter Pro
- Order FairStars Audio Converter
- Order FairStars Recorder
- Order FairStars MP3 Recorder
Support
Freeware
Support - FAQ(Frequently Asked Questions)
FairStars CD Ripper
Q: Is FairStars CD Ripper free?
A: Yes. It is a freeware, and also not include any AD software.
Q: The output audio files are all noise when I rip some CD, how should I do?
A: Maybe the CD is DTS Audio CD. Please try to rip it to WAV format, and rename .wav files to .dts, then convert .dts files to MP3 or other format files by using FairStars Audio Converter Pro.
Q: How to rip DTS Audio CD?
A: You may do as follow:
1. Rip DTS Audio CD to WAV format by using FairStars CD Ripper.
2. Rename .wav files to .dts.
3. Convert .dts files to MP3 or other format files by using FairStars Audio Converter Pro
Q: How to query Audio CD information from freedb?
A: Insert a CD into CD/DVD drive, then press the Query button after CD Ripper detects the CD.
Q: What should I do if the query results contain unrecognized characters?
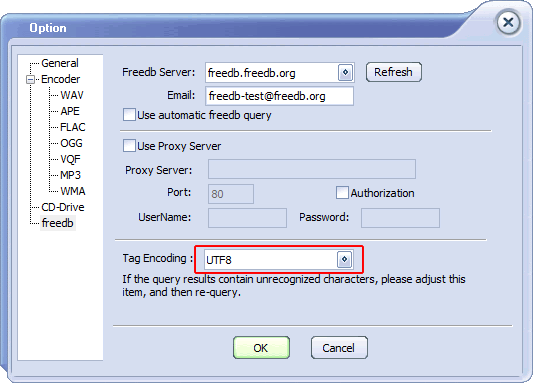
A: Please try to adjust the item "Option -> freedb -> Tag Encoding", and then re-query( Figure 3 ).
Q: I have not found my CD/DVD drive in Device selection box, how should I do?
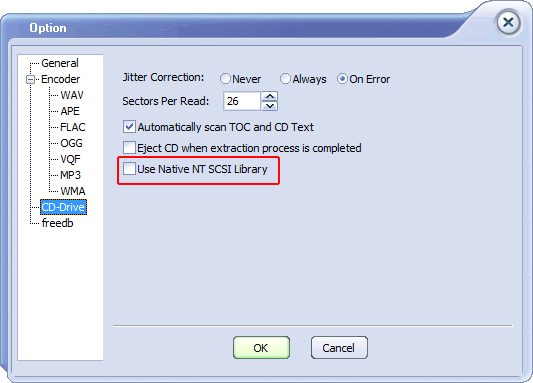
A: Please try to change "Use Native NT SCSI Libray" setting in CD-Drive page of Option dialog( Figure 2 ).
Q: How to rip a CD?
A:
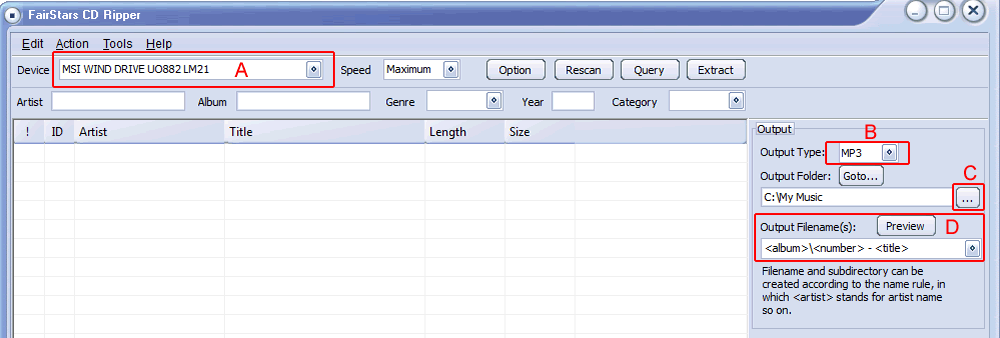
1. Select your current CD/DVD drive in Device combo box ( Figure 1. A ).
Note:
If no item or no your current used drive in Device, please try to change "Use Native NT SCSI Libray" setting in CD-Drive page of Option dialog ( Figure 2 ).
2. Insert an Audio CD to your CD/DVD drive.
3. After CD Ripper detects the CD, click "Query" button to connect to a freedb-server to download the disc data.
If no disc data was received, you may enter the disc infoamtion to the CD Disc Tag Area: Artist, Alubm, Genre, Year, and Category field. You may also set the Title, Artist, Comment for each track by click the menu Edit - Track Edit.
Note: If the query results contain unrecognized characters, please try to adjust the item "Option -> freedb -> Tag Encoding", and then re-query(Figure 3).
4. Set the Output Format from the Output Panel ( Figure 1. B ).
5. Select the output folder by click the browse button "..." to browse for an folder ( Figure 1. C ).
6. Set the name rule of the output files: You can change the "Output Filename(s)" template, and you may preview the output file name by click the "Preview" button ( Figure 1. D ).
7. Click the "Extract" button to pop a extracting dialog, and start the ripping process.

Figure 1

Figure 2

Figure 3